You bought the dumbbells. They’ve been sitting in the corner of your bedroom for two weeks. Every time you walk past them you think — I should use those — and then you get busy, and then they sit there for another day.
Sound familiar? You’re not lazy. You just don’t have a plan.
That’s exactly what this is. A complete, beginner-friendly full body dumbbell workout you can do entirely at home — no bench, no gym, no previous experience required. Three days a week, 35–40 minutes per session, every exercise explained clearly enough that you’ll know exactly what you’re doing before you pick up a single weight.
By the end of this guide you’ll have a 3-day dumbbell workout plan, a clear understanding of how to make progress over time, and no more excuses for those dumbbells sitting in the corner.
Key Takeaways
- A 3-day full body dumbbell workout is the most effective structure for beginners — research from the Journal of Strength and Conditioning Research consistently shows full-body training 3x per week produces superior muscle and strength gains compared to split routines for those new to training
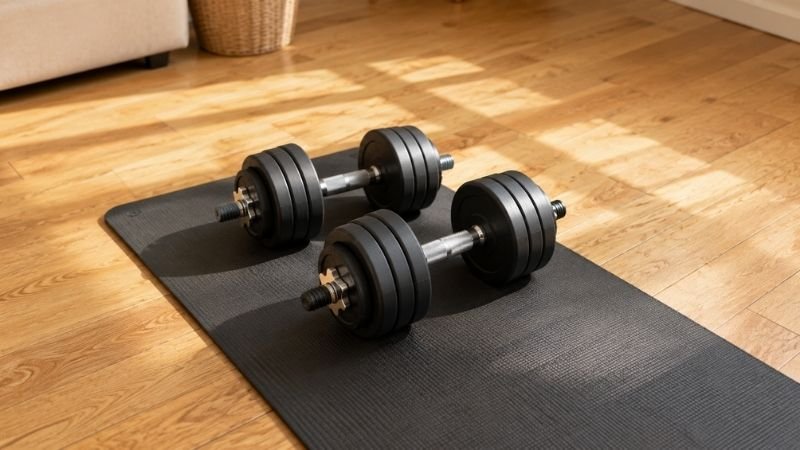
- You need one pair of dumbbells (or adjustable dumbbells) and a yoga mat — no bench, no rack, no gym
- Beginners should start with a weight they can lift with good form for 10–12 reps — if you can’t complete 10 reps, go lighter; if 15 feels easy, go heavier
- Progressive overload — gradually increasing the challenge over time — is the single most important factor in getting results from any dumbbell workout
- Visible strength and muscle changes typically take 4–6 weeks of consistent training; don’t judge results in week one
What You Need (And What You Don’t)
Let’s keep this simple. For this full body dumbbell workout at home, you need:
Required:
- One pair of dumbbells (or adjustable dumbbells) — more on choosing the right weight below
- A yoga mat or soft surface for floor exercises
- About 35–40 minutes, three times a week
Not required:
- A weight bench (every exercise in this plan has a floor alternative)
- A barbell or rack
- A gym membership
- More than one pair of dumbbells if you’re just starting out
How Heavy Should Your Dumbbells Be?
This is the question every beginner asks, and there’s no single answer — it depends on your current strength level. The right weight is one that feels genuinely challenging by rep 10–12, but still allows you to maintain good form throughout.
A practical starting point for most beginners:
- Women: 8–15 lbs (3–7 kg) for most exercises; 5–8 lbs for shoulder work
- Men: 15–25 lbs (7–12 kg) for most exercises; 10–15 lbs for shoulder work
If you’re investing in a single pair, adjustable dumbbells give you the most flexibility as you get stronger. A fixed pair at the right starting weight works fine too — you’ll just need to upgrade in a few months, which is actually a good sign.
Sportzillax editor note: Don’t start too heavy trying to impress yourself. Starting light and building proper form is how you avoid the injuries that set beginners back for weeks. Your ego can handle 8 lb dumbbells. Your rotator cuff is less forgiving.
How This 3-Day Dumbbell Plan Works
This plan follows a 3-day full body split: you train Monday, Wednesday, and Friday (or any three non-consecutive days that work for your schedule), with rest or light activity on the days in between.
Why full body and not an upper/lower split? Because for beginners, hitting each muscle group three times per week produces faster strength and muscle gains than training each muscle once a week. Your muscles need frequent stimulation to adapt — and with three full body sessions, you get exactly that without overtraining.
Each session takes approximately 35–40 minutes including warm-up. The three training days use slightly different exercises to give variety while still training the same movement patterns — push, pull, squat, hinge, and carry.
The basic structure of each session:
- Warm-up: 5 minutes
- Main workout: 6 exercises × 3 sets of 10–12 reps
- Rest between sets: 60–90 seconds
- Cool-down: 3–5 minutes
Run this plan for 4–6 weeks before reassessing. By week 4, you should be noticeably stronger than week 1 — able to use heavier weights or complete more reps with the same weight. That’s the signal to progress.
Warm-Up (Do This Before Every Session — 5 Minutes)
Never skip the warm-up. Cold muscles don’t move as well and are more prone to strain.
- Arm circles — 20 seconds forward, 20 seconds backward
- Hip circles — hands on hips, 10 slow circles each direction
- Bodyweight squats — 10 slow reps, focus on depth and control
- Inchworms — 5 reps: hinge forward, walk hands to plank, walk back up
- Shoulder rotations with arms extended — 10 reps each direction
Day 1 — Full Body Strength (Push Focus)
Exercise 1: Goblet Squat
Sets: 3 | Reps: 10–12 | Rest: 60–90 seconds
Hold one dumbbell vertically at your chest with both hands cupped underneath. Feet shoulder-width apart, toes pointed slightly out. Lower down slowly — aim to get your thighs parallel to the floor or as low as comfortable. Keep your chest tall and your knees tracking over your toes. Drive through your heels to stand.
What it should feel like: You’ll feel this in your quads and glutes. By rep 10, your legs should feel genuinely challenged.
No modifications needed — this is already the most beginner-friendly squat variation.
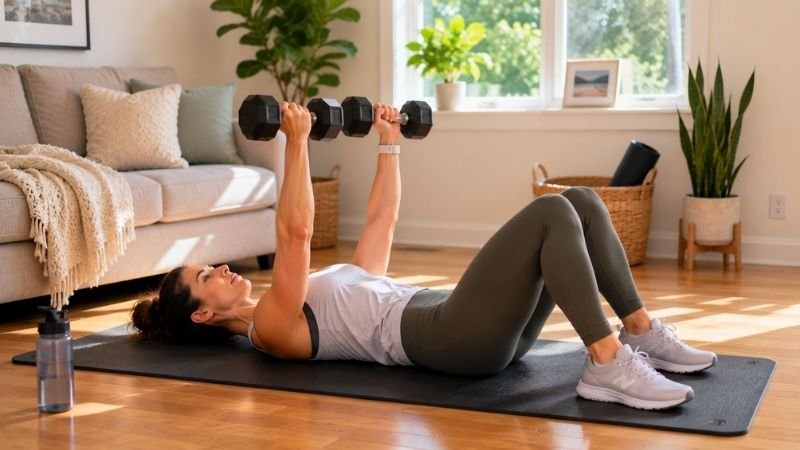
Exercise 2: Dumbbell Floor Press
Sets: 3 | Reps: 10–12 | Rest: 60–90 seconds
Lie on your back on your mat, knees bent, feet flat on the floor. Hold a dumbbell in each hand at chest level, elbows at roughly 45 degrees from your body. Press the dumbbells up until your arms are fully extended, then lower slowly back down. Pause when your elbows touch the floor — don’t bounce.
This is the floor alternative to a bench press. It works your chest, shoulders, and triceps just as effectively — and many coaches argue the floor press is actually better for shoulder health.
Exercise 3: Dumbbell Romanian Deadlift
Sets: 3 | Reps: 10–12 | Rest: 60–90 seconds
Stand with feet hip-width apart, a dumbbell in each hand hanging in front of your thighs. Hinge at your hips — push your hips back as you lower the dumbbells down your legs, keeping your back flat and the weights close to your body. Lower until you feel a stretch in your hamstrings (usually mid-shin level for most beginners), then drive your hips forward to stand back up.
What it should feel like: A deep pull in the back of your thighs (hamstrings) and glutes. If you feel it in your lower back, you’re likely rounding your spine — reduce the weight and focus on the hip hinge.
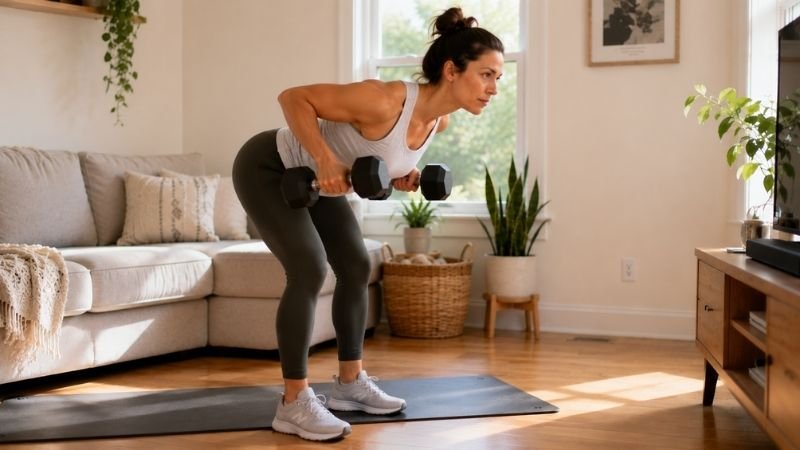
Exercise 4: Dumbbell Bent-Over Row
Sets: 3 | Reps: 10–12 per side | Rest: 60–90 seconds
Stand with feet hip-width apart, hinge forward at the hips until your torso is roughly parallel to the floor (or as low as comfortable). Hold a dumbbell in each hand hanging toward the floor. Pull both dumbbells up toward your hips, squeezing your shoulder blades together at the top. Lower slowly.
What it should feel like: The muscles between and below your shoulder blades working hard. This is one of the most important exercises in any beginner program — it counteracts all the time we spend hunched over screens.
Exercise 5: Dumbbell Shoulder Press
Sets: 3 | Reps: 10–12 | Rest: 60–90 seconds
Sit on a chair or stand with feet hip-width apart. Hold a dumbbell in each hand at shoulder height, palms facing forward. Press both dumbbells up overhead until your arms are fully extended, then lower slowly back to start. Keep your core engaged — don’t arch your lower back as you press.
Easier option: Use lighter dumbbells or do one arm at a time, using your free hand to brace against a wall.
Exercise 6: Dumbbell Glute Bridge
Sets: 3 | Reps: 12–15 | Rest: 60 seconds
Lie on your back, knees bent, feet flat on the floor. Place a dumbbell on your hips and hold it in place with both hands. Drive your hips up toward the ceiling, squeezing your glutes hard at the top. Hold for 1 second, then lower slowly. Don’t let your hips drop all the way to the floor between reps — maintain tension.
This exercise specifically targets your glutes. Strong glutes improve posture, protect your lower back, and make everything else in this program feel easier.
Day 2 — Rest or Active Recovery
Complete rest is fine. A 20–30 minute walk is even better. This is not a day to squeeze in an extra workout — your muscles are rebuilding and getting stronger during this window.
If you’re feeling sore after Day 1, that’s normal for the first 1–2 weeks. The soreness (DOMS — delayed onset muscle soreness) is not a sign of injury. It’s a sign your muscles encountered a new stimulus and are adapting.
Day 3 — Full Body Strength (Pull Focus)
Exercise 1: Dumbbell Reverse Lunge
Sets: 3 | Reps: 10 per leg | Rest: 60–90 seconds
Stand tall with a dumbbell in each hand. Step one foot back, lower your back knee toward (not touching) the floor, then step back to standing. Alternate legs. Keep your front knee tracking over your front foot — don’t let it cave inward.
Easier than forward lunges for most beginners — the reverse motion is more stable and reduces knee stress.
Exercise 2: Dumbbell Chest Fly (Floor)
Sets: 3 | Reps: 10–12 | Rest: 60–90 seconds
Lie on your back, knees bent. Hold a dumbbell in each hand with arms extended above your chest, palms facing each other. With a slight bend in your elbows, lower your arms out to the sides until you feel a stretch across your chest. Squeeze your chest to bring the dumbbells back together above you. Keep the movement slow and controlled — this is not a pressing movement.
Exercise 3: Dumbbell Deadlift
Sets: 3 | Reps: 10–12 | Rest: 60–90 seconds
Stand with feet hip-width apart, dumbbells on the floor in front of you. Hinge at the hips and bend your knees to grip the dumbbells. Keep your chest up and back flat as you drive through your heels to stand, bringing the dumbbells up alongside your legs. Lower back down with control.
This is a full body movement — legs, back, core, and grip all working together. It’s one of the most functional exercises you can do.
Exercise 4: Dumbbell Single-Arm Row
Sets: 3 | Reps: 10–12 per arm | Rest: 60–90 seconds
Place one hand and the same-side knee on a sturdy chair or your bed for support. Hold a dumbbell in your other hand, letting it hang toward the floor. Pull the dumbbell up toward your hip, keeping your elbow close to your body. Lower slowly. Complete all reps on one side before switching.
Single-arm rows allow a greater range of motion than the two-arm version and help address strength imbalances between sides.
Exercise 5: Dumbbell Lateral Raise
Sets: 3 | Reps: 10–12 | Rest: 60 seconds
Stand with a dumbbell in each hand, arms at your sides. With a slight bend in your elbows, raise both arms out to the sides until they reach shoulder height. Lower slowly — take 2–3 seconds on the way down. Don’t swing or use momentum.
Use lighter dumbbells for this one than the other exercises — the shoulder muscles are smaller and most beginners overestimate how heavy they can go here.
Exercise 6: Dumbbell Hammer Curl
Sets: 3 | Reps: 10–12 | Rest: 60 seconds
Stand with a dumbbell in each hand, palms facing each other (thumbs up). Curl both dumbbells up toward your shoulders, keeping your elbows pinned at your sides. Lower slowly. The hammer grip (versus a regular curl) targets both your biceps and your forearms.
Day 4 — Rest
Day 5 — Full Body Strength (Total Body)
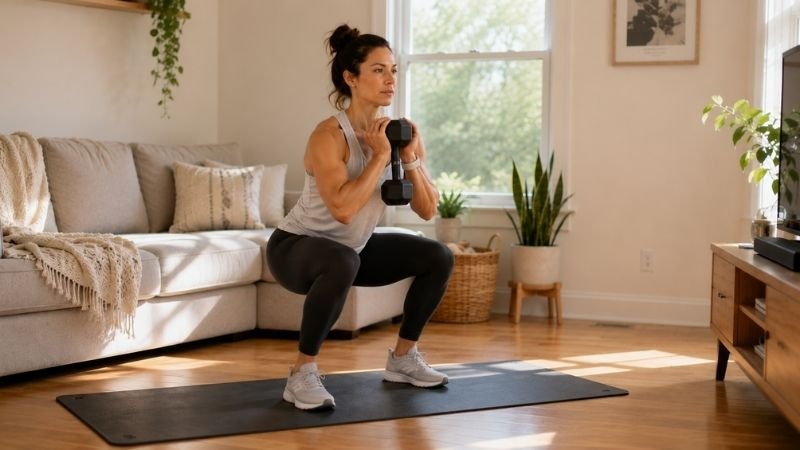
Exercise 1: Dumbbell Sumo Squat
Stand with feet wider than shoulder-width, toes pointed out at 45 degrees. Hold one dumbbell with both hands hanging between your legs. Squat down, keeping your knees tracking over your toes. Drive through your heels to stand, squeezing your glutes at the top. Sets: 3 | Reps: 12–15
Exercise 2: Dumbbell Push-Up Row
Start in a push-up position with a dumbbell in each hand. Perform one push-up, then row one dumbbell up to your hip. Lower it, do another push-up, then row the other side. That’s one rep. Sets: 3 | Reps: 6–8 (this one is tough — fewer reps is fine) Easier option: Do the push-up on your knees, then stand the dumbbells up and do the rows separately.
Exercise 3: Dumbbell Step-Up
Stand in front of a sturdy chair or low step. Hold a dumbbell in each hand. Step one foot up onto the chair, drive through that heel to bring your full body up, step back down. Complete all reps on one leg before switching. Sets: 3 | Reps: 10 per leg
Exercise 4: Dumbbell Bicep Curl to Press
Hold a dumbbell in each hand at your sides. Curl both up to your shoulders, then press them overhead. Reverse the motion — lower from overhead back to shoulders, then lower to sides. That’s one rep. Sets: 3 | Reps: 10–12
Exercise 5: Dumbbell Tricep Kickback
Hinge forward at the hips, a dumbbell in each hand. Bring your upper arms parallel to the floor, elbows at 90 degrees. Extend your forearms back until your arms are fully straight. Squeeze your triceps at the top, then return to start. Sets: 3 | Reps: 10–12
Exercise 6: Dumbbell Farmers Carry (in place)
Hold a heavy dumbbell in each hand. Stand tall, shoulders back, core braced. March in place for 30 seconds, lifting your knees to hip height with each step. Sets: 3 | Duration: 30 seconds | Rest: 60 seconds
How to Progress After 4 Weeks
This is the part most beginner guides skip — and it’s the most important part.
Progressive overload means continuously giving your muscles a new challenge. Without it, your body adapts to the current workload and stops changing. With it, you keep getting stronger indefinitely.
For this dumbbell plan, here’s how to progress:
Method 1 — Add reps: If you can complete all 3 sets of 12 reps with good form, do 13 next session. Then 14. When you hit 15 reps comfortably across all sets, move to Method 2.
Method 2 — Add weight: Increase your dumbbell weight by the smallest available increment (usually 2–5 lbs). Drop back to 10 reps with the heavier weight and build back up to 15 over the following weeks.
Method 3 — Slow the tempo: Same weight, same reps, but take 3 seconds to lower the weight instead of 1. This dramatically increases the difficulty without changing anything else.
After completing 4–6 weeks of this plan, you’re ready to progress to a more advanced dumbbell split — upper/lower or push/pull/legs — with more exercises per session and higher total volume.
Dumbbell Workout for Weight Loss — What to Actually Expect
If fat loss is your main goal, strength training with dumbbells is one of the most effective tools available — but not for the reason most people think.
Dumbbell training doesn’t burn massive calories during the workout itself (a 35-minute session burns roughly 150–250 calories depending on intensity and body weight). What it does do is build muscle, and muscle tissue burns more calories at rest than fat tissue. Over weeks and months, this raises your resting metabolic rate — meaning you burn more calories even when you’re not exercising.
Combined with a modest calorie deficit and adequate protein (aim for 0.7–1g per pound of body weight), this plan will absolutely support fat loss. The NIH recommends resistance training as a primary component of any sustainable weight loss program, precisely because it preserves and builds muscle while losing fat.
Realistic expectation: 4–6 weeks of consistent training plus reasonable nutrition can produce 1–2 lbs of fat loss per week. The scale may not move dramatically early on as your body builds muscle simultaneously — measure your waist and how your clothes fit as an additional progress indicator.
Common Mistakes Beginners Make With Dumbbell Workouts
Going too heavy, too soon. The most common beginner mistake. Ego-lifting with weights too heavy to control leads to poor form, reduced muscle activation, and eventually injury. Start lighter than you think you need to. Good form always trumps heavy weight.
Rushing through reps. Fast, bouncy reps use momentum rather than muscle. Slow down the lowering phase — 2–3 seconds on the way down. You’ll feel the difference immediately.
Skipping the lower body. Many beginners focus only on arms and chest, completely neglecting legs and glutes. This plan intentionally trains your full body every session. Don’t cherry-pick the exercises you like — the leg and hinge movements are often the most impactful.
Not tracking progress. You can’t progressive overload if you can’t remember what weight you used last session. Keep a simple notes file on your phone: date, exercise, weight, sets, reps. Five seconds per exercise, game-changing over time.
Expecting results in one week. Strength adaptations happen in 2–3 weeks. Visible muscle changes take 4–8 weeks. Stick to the plan even when week two feels discouraging.
Frequently Asked Questions
Can I do this full body dumbbell workout every day? No — and you shouldn’t want to. Muscles grow during recovery, not during the workout itself. This plan is designed for 3 days per week with rest days between sessions. Training the same muscles daily as a beginner will slow your progress and increase injury risk.
What if I only have one dumbbell? You can still do most of these exercises — just do them one side at a time. Goblet squat, single-arm rows, single-arm press, and single-arm Romanian deadlift all work well with one dumbbell. It’s not ideal long-term, but it’s a legitimate starting point.
How long should I rest between sets? For beginners, 60–90 seconds between sets is ideal. Long enough to partially recover, short enough to maintain workout intensity. If you’re gasping for breath at 90 seconds, rest a bit longer. If you feel completely fresh at 60 seconds, the weight might be too light.
Can I do cardio on the same days as this dumbbell workout? Yes — but do the strength workout first, then cardio after. Doing cardio before strength training depletes the energy your muscles need for lifting. A 20-minute walk or HIIT session after your dumbbell workout is a great combination for fat loss goals.
Will this dumbbell workout make women bulky? No. Building significant muscle mass requires years of progressive training, very high calorie intake, and (for extreme cases) specific hormonal conditions that most women don’t have. This plan will build functional strength, improve muscle tone, and increase your metabolic rate — none of which look or feel “bulky.”
How do I know if I’m using the right weight? The right weight is one where the last 2–3 reps of each set feel genuinely hard — you could probably do 1–2 more with perfect form, but not 5 more. If you finish all 12 reps and feel like you could easily do 15, go heavier. If you can’t complete 8 reps with good form, go lighter.
Your Next Step
You now have everything you need: a complete 3-day plan, every exercise explained, and a clear path to progress. The only thing left is to actually start.
Pick up those dumbbells sitting in the corner. Do the warm-up. Start with Day 1.
When you want to understand how your strength training fits into a broader fat loss plan, read this next: → Why You’re Working Out But Not Losing Weight (7 Real Reasons)
If you want to add a cardio element to your routine on rest days, this is the perfect complement: → Beginner HIIT Workout at Home: 20 Minutes, No Equipment, Real Results
References
- Ralston, G.W., et al. (2017). The Effect of Weekly Set Volume on Strength Gain: A Meta-Analysis. Sports Medicine.
- Schoenfeld, B.J., et al. (2016). Effects of Resistance Training Frequency on Measures of Muscle Hypertrophy: A Systematic Review and Meta-Analysis. Sports Medicine.
- National Institutes of Health (NIH). Physical Activity and Your Weight. https://www.nhlbi.nih.gov/health/educational/lose_wt/Physical/physical.htm
- American College of Sports Medicine (ACSM). Progression Models in Resistance Training for Healthy Adults. Medicine & Science in Sports & Exercise.