If someone told you to “work your core” and you immediately pictured yourself on the floor doing crunches until your neck hurt — you’re not alone. That’s what most people picture. And it’s also exactly what most fitness professionals have moved away from recommending for beginners.
Here’s the honest truth: crunches are one of the least effective core exercises available. They train only a small portion of your core muscles, they’re hard on your cervical spine and lower back, and for many people — including postpartum women, anyone with lower back sensitivity, and most beginners — they can cause more discomfort than benefit.
There are better options. Much better options. And they’re easier, safer, and more effective than any sit-up you’ve ever done.
This beginner core workout gives you 10 exercises that work your entire core — not just your abs — without a single crunch. You’ll also get a complete 10-minute routine you can do at home today, an explanation of what “core training” actually means (it’s different from what most people think), and specific guidance for postpartum moms who need a safe starting point.
Key Takeaways
- Your core includes more than 30 muscles — not just your abs; effective core training targets the deep stabilizing muscles (transverse abdominis, multifidus, pelvic floor) that crunches almost entirely miss
- Crunches primarily train the rectus abdominis while placing stress on the cervical spine and lumbar discs — research published in the Journal of Orthopedic & Sports Physical Therapy found that spinal flexion exercises like crunches are contraindicated for people with disc issues and unnecessary for healthy beginners
- The Dead Bug, Bird Dog, and Plank consistently outperform crunches for overall core activation in EMG studies — these are your foundation movements
- 10 minutes of focused core training, 3 days per week is sufficient to build meaningful core strength for beginners within 4–6 weeks
- Postpartum women should wait for medical clearance (typically 6–12 weeks) before beginning core strengthening exercises, and should avoid exercises that cause “coning” or “doming” at the midline
- A strong core reduces lower back pain, improves posture, enhances performance in all other exercises, and makes daily activities easier — results are functional before they’re visible
What Is “Core Training” — And Why It’s Not the Same as “Ab Training”
Before the exercises, let’s clear up the most common misconception in beginner fitness.
Most people use “core” as a synonym for “abs.” It’s not. Your abs — specifically your rectus abdominis, the muscle responsible for the six-pack appearance — are one of approximately 30 muscles that make up your core. The others include your obliques (side waist), transverse abdominis (deep stabilizer), multifidus (spinal stabilizer), erector spinae (back muscles), diaphragm, and pelvic floor.
When people say they want a “stronger core,” they usually mean they want visible abs. But what a strong core actually does is far more valuable:
- Stabilizes your spine under load — protecting your lower back during lifting, carrying, and daily movement
- Improves posture — reducing the forward rounding that comes from hours of sitting
- Enhances performance in every other exercise — squats, deadlifts, and even cardio all require a strong, stable core
- Reduces lower back pain — the most common musculoskeletal complaint in adults, often caused by weak deep core muscles
Crunches train one muscle in isolation without addressing any of these functions. The exercises in this guide train your core as the integrated stability system it actually is.
Sportzillax editor note: You will not get a six-pack from this workout. That’s a nutrition and body fat percentage conversation. What you will get is a core that works properly — and that matters a lot more for your long-term health and fitness than visible abs.
The 10 Best Core Exercises for Beginners (No Crunches)
These exercises are organized from foundational to slightly more challenging. If you’re just starting out, spend 1–2 weeks on the first five before adding the second five.
Exercise 1: Diaphragmatic Breathing (360° Breathing)
Why it’s first: Most people breathe incorrectly — shallow chest breathing that keeps the core in a state of low activation. Learning to breathe with your full diaphragm is the actual foundation of core training.
How to do it: Lie on your back, knees bent, feet flat. Place one hand on your chest, one on your belly. Inhale slowly through your nose — your belly should rise first, then your ribcage should expand in all directions (front, sides, back). Exhale fully through your mouth. Repeat for 5 full breaths.
Sets/Duration: 5 breaths before every core session — this is your activation warm-up, not an optional add-on.
What it should feel like: Your chest hand should barely move. The breath goes into your belly and ribs. If you feel your shoulders rise, slow down and breathe lower.
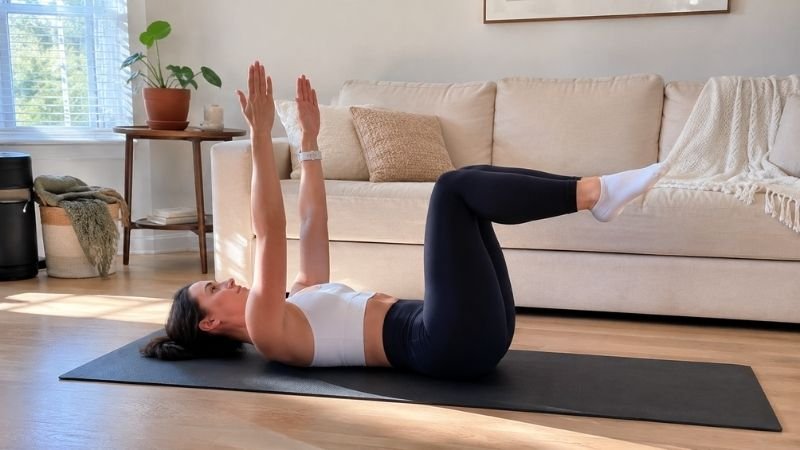
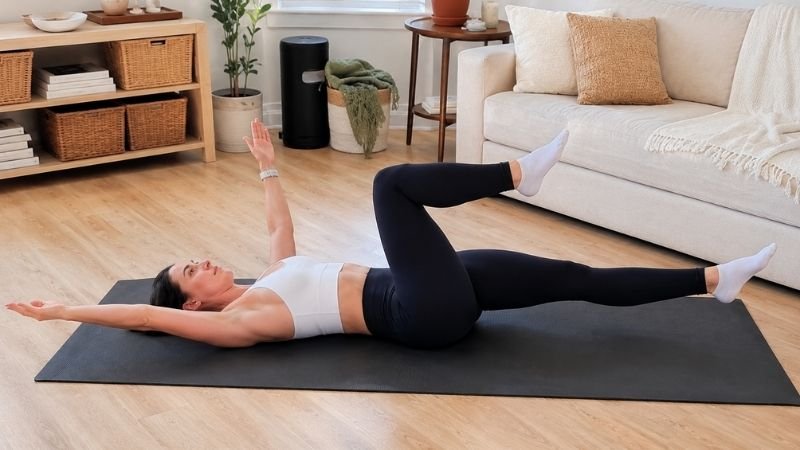
Exercise 2: Dead Bug
Why it’s essential: The Dead Bug is arguably the best beginner core exercise available. It trains your core to resist extension (lower back arching) while your limbs move — which is exactly how your core works in real life. Research consistently shows higher deep core muscle activation than traditional crunches.
How to do it: Lie on your back, arms pointing straight to the ceiling, knees bent to 90 degrees (tabletop position). Brace your core — press your lower back gently into the floor. Slowly lower your right arm toward the floor behind your head while simultaneously extending your left leg toward the floor. Keep your lower back pressed down throughout. Return both limbs to start. Repeat on the opposite side.
Sets/Reps: 3 × 6 per side (beginners), building to 3 × 10 per side over 4 weeks.
The critical cue: Your lower back must stay in contact with the floor the entire time. If it arches up, you’ve gone too far — reduce the range of motion until you build strength.
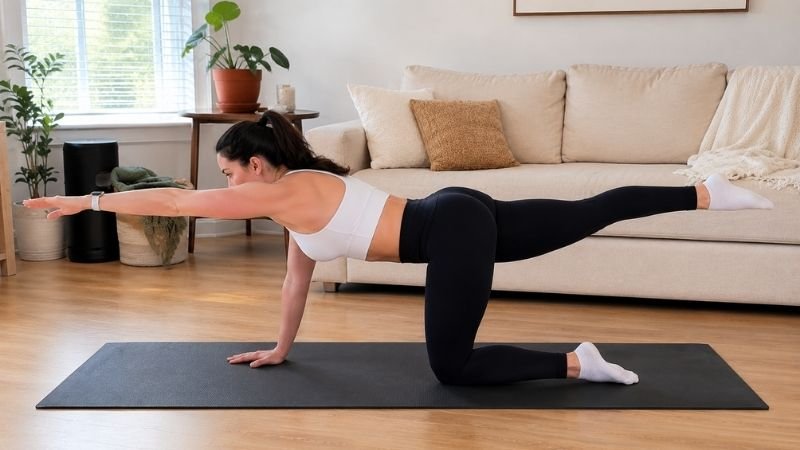
Exercise 3: Bird Dog
Why it’s essential: Bird Dog trains your core and lower back muscles to stabilize your spine while opposite limbs extend — an anti-rotation and anti-extension challenge that directly reduces lower back pain risk.
How to do it: Start on hands and knees — hands under shoulders, knees under hips. Brace your core. Extend your right arm forward and left leg behind simultaneously, keeping your hips level (don’t let them rotate or tilt). Hold for 2 seconds, then return. Repeat on the opposite side.
Sets/Reps: 3 × 8 per side.
What it should feel like: Your hips should stay perfectly level throughout. If they’re rotating, you’re going too fast — slow down significantly and focus on control.
Exercise 4: Glute Bridge
Why it’s here: A glute bridge isn’t only for glutes — it requires significant core stabilization to maintain a neutral spine in the elevated position, and it trains your posterior chain (glutes, hamstrings, lower back) that is chronically underactive in most people.
How to do it: Lie on your back, knees bent, feet flat. Brace your core. Drive through your heels to lift your hips until your knees, hips, and shoulders form a straight line. Squeeze your glutes hard at the top. Hold 1–2 seconds. Lower slowly.
Sets/Reps: 3 × 12–15.
Progression: Once this feels easy, add a 3-second hold at the top, or place a light resistance band just above your knees and press outward throughout the movement.
Exercise 5: Modified Plank (Knees Down)
Why it’s here: Planks are one of the most researched core exercises, with high activation of the transverse abdominis, rectus abdominis, and obliques simultaneously. The knee-down version makes it accessible for beginners.
How to do it: Start on your hands and knees. Walk your hands forward until your body forms a straight line from head to knees. Your hips should be level — not too high, not sagging. Brace your core and hold.
Sets/Duration: 3 × 15–20 second holds initially, building to 3 × 40 seconds over 4–6 weeks.
When to progress: Once you can hold a knee plank for 40 seconds with perfect form, move to a full plank (feet on the floor). Don’t rush this — a knee plank held correctly is far more effective than a full plank with a sagging lower back.
Exercise 6: Heel Slide
Why it’s here: This is one of the safest core exercises for postpartum women, those with lower back sensitivity, and absolute beginners. It teaches the core to stabilize the pelvis during leg movement — foundational for everything else.
How to do it: Lie on your back, knees bent, feet flat. Brace your core and keep your lower back still. Slowly slide one heel along the floor, extending the leg as far as possible without your lower back moving. Return slowly. Alternate sides.
Sets/Reps: 3 × 10 per side.
Exercise 7: Standing Pallof Press
Why it’s unique: The Pallof Press is the best anti-rotation core exercise for beginners — it trains your core to resist twisting forces, which is how your core stabilizes your spine during almost all real-world activity.
How to do it (resistance band version): Anchor a resistance band at chest height (in a door). Stand sideways to the anchor point, feet shoulder-width apart. Hold the band at your chest with both hands. Press both hands straight forward — the band will try to rotate you toward the anchor; your core’s job is to resist. Hold for 2 seconds. Return to chest. Complete all reps on one side before switching.
Sets/Reps: 3 × 10 per side.
No band? Do a Standing Core Hold instead: stand tall, brace your core as hard as you can for 10 seconds, relax. Repeat 10 times. Sounds simple — genuinely effective.
Exercise 8: Reverse Crunch
Why it’s in here (instead of regular crunches): If you want to include a flexion-based movement, the reverse crunch is significantly safer than a standard crunch — it works the lower rectus abdominis without placing load on the cervical spine, and it maintains a more neutral lumbar curve throughout.
How to do it: Lie on your back, knees bent to 90 degrees, feet lifted off the floor. Brace your core. Use your lower abdominals to curl your hips and knees toward your chest — a small, controlled movement. Lower slowly. This is not a momentum exercise.
Sets/Reps: 3 × 10–12.
The key difference from crunches: Your upper body stays completely still. Only your hips move. If your back is arching or you’re swinging your legs, reduce the range of motion.
Exercise 9: Side Plank (Modified)
Why it’s here: The side plank activates the obliques and quadratus lumborum (lateral stabilizer) more effectively than any crunch variation — these muscles are critical for spine stability and are almost entirely missed by traditional ab training.
How to do it (modified): Lie on your side, legs stacked. Support yourself on your bottom forearm and your bottom knee. Lift your hips to create a straight line from your knee to your shoulders. Hold.
Sets/Duration: 3 × 15–20 second holds per side.
Progression: Once stable, straighten your bottom leg (feet stacked) for the full side plank.
Exercise 10: Standing Dead Bug (Tall Kneeling Variation)
Why it’s last: This is a progression of the Dead Bug done in a kneeling position — it challenges your core in a more upright, functional position while still being accessible for beginners.
How to do it: Kneel tall on a yoga mat, hips directly over knees. Brace your core — don’t let your lower back arch. Extend both arms forward. Hold for 10 seconds. Return. Add arm movement variations as you progress.
Sets/Duration: 3 × 10 second holds, building to 3 × 20 seconds.
Your Complete 10-Minute Beginner Core Workout
Put these exercises together into a complete routine:
Warm-up (2 minutes):
- Diaphragmatic breathing — 5 full breaths
- Gentle cat-cow — 8 slow reps
Main Circuit (8 minutes):
| Exercise | Sets | Reps/Duration | Rest |
|---|---|---|---|
| Dead Bug | 2 | 6 per side | 30 sec |
| Bird Dog | 2 | 8 per side | 30 sec |
| Modified Plank | 2 | 20 sec hold | 30 sec |
| Glute Bridge | 2 | 12 reps | 30 sec |
| Heel Slide | 2 | 8 per side | 30 sec |
Total time: approximately 10 minutes. Do this 3 times per week, on non-consecutive days.
Progress after 3–4 weeks: Add Side Plank and Pallof Press, increase reps by 2 on all exercises, extend plank holds to 30 seconds.
Core Exercises for Beginners Women: What to Know (Especially Postpartum)

Core training for women — particularly those who are postpartum or have experienced pregnancy — requires specific consideration that most beginner guides don’t address.
Diastasis recti awareness: During pregnancy, the abdominal muscles can separate at the midline (diastasis recti). This is common and normal, but it changes which exercises are appropriate. If you notice a “coning” or “doming” effect — a ridge or peak at the center of your abdomen during core exercises — stop that exercise. All exercises in this guide are designed to minimize this risk, but if you have a significant diastasis, work with a pelvic floor physiotherapist before beginning.
Pelvic floor first: Before doing any core exercises postpartum, ensure you have pelvic floor function. If you experience leaking during exercise (even a small amount), pelvic pressure, or pain, these are signs to seek pelvic floor physiotherapy before progressing.
The safest starting exercises postpartum: Diaphragmatic breathing, heel slides, and glute bridges are appropriate for most women from approximately 6 weeks postpartum (after medical clearance). The Dead Bug and Bird Dog can typically be introduced at 8–10 weeks. Planks and side planks: wait until you can complete all foundational exercises without symptoms.
For a complete guide to postpartum exercise, see our Postpartum Workout Plan.
Why Your Core Training Isn’t Working (And What to Fix)
If you’ve done core work before without results, these are the most likely reasons:
You’re only training your abs. Crunches, sit-ups, and leg raises in isolation don’t build functional core strength. The exercises in this guide address your entire core system.
You’re not bracing correctly. “Bracing” means creating intra-abdominal pressure — imagine someone is about to lightly punch your stomach and you tighten to protect yourself. This is different from “sucking in.” Practice bracing before and during every exercise.
You’re training too fast. Core exercises done at speed rely on momentum rather than muscle activation. Slow down the Dead Bug. Pause at the top of the Glute Bridge. Control the lowering phase of every movement. Slower = more effective.
You’re skipping it. Core training is almost universally the first thing dropped when time gets tight. Building it into a workout as the final 10 minutes, rather than treating it as a standalone session, dramatically improves adherence.
When Only 5 Minutes Is Available
On the days when 10 minutes feels impossible, do this:
- Dead Bug — 2 × 6 per side
- Bird Dog — 2 × 6 per side
- Modified Plank — 2 × 20 seconds
Five minutes. Three exercises. It maintains the neural activation patterns you’ve been building. It keeps the habit alive. It counts.
Warning Signs to Take Seriously
Stop a core exercise and consult a healthcare professional if you experience:
- Sharp or shooting pain in your lower back or hips during any exercise
- Numbness, tingling, or pain radiating down your leg
- Visible coning or doming at your midline during core exercises (possible diastasis recti)
- Pelvic pressure, heaviness, or leaking during core training
- Pain that persists beyond 24–48 hours after a session
These aren’t reasons to stop exercising — they’re reasons to get professional guidance so you can exercise safely and effectively.
Frequently Asked Questions
What is the best core exercise for beginners? The Dead Bug is the most consistently recommended beginner core exercise by physiotherapists and strength coaches. It trains deep core activation, anti-extension stability, and coordination without any spinal loading — making it safe and effective for virtually all beginners, including postpartum women.
How long does it take to see results from core training? Functional results — reduced lower back tension, improved posture, stronger performance in other exercises — typically appear within 3–4 weeks of consistent training. Visible changes to your midsection depend far more on body fat percentage than core exercise, and take significantly longer (months, not weeks).
Can beginners do planks? Yes, starting with the modified (knee) plank version. A knee plank held with perfect form is genuinely effective and appropriate for most beginners. Progress to a full plank only when you can hold the knee version for 40+ seconds without form breakdown.
Are core exercises safe for postpartum women? Some are, after medical clearance. Diaphragmatic breathing, heel slides, and glute bridges are appropriate from approximately 6 weeks postpartum for most women. Planks, side planks, and rotation exercises should wait until foundational movements are symptom-free. Always get clearance from your doctor or midwife before beginning postpartum core training.
How often should beginners do core exercises? Three times per week on non-consecutive days is ideal. Core muscles recover relatively quickly compared to larger muscle groups, but still need 48 hours between sessions. A 10-minute core session 3x per week, sustained over 6–8 weeks, produces meaningful and lasting strength improvements.
Start With the Dead Bug Tonight
You now have 10 exercises, a complete 10-minute routine, and a clear understanding of what core training actually is — and what it isn’t.
The simplest possible starting point: tonight, lie on your back and do 5 breaths of diaphragmatic breathing followed by 6 Dead Bugs per side. That’s it. That’s your first beginner core workout. It takes 4 minutes.
Come back in two days and add Bird Dog. Two days after that, add the Plank. Build from there.
When you’re ready to combine your core training with a complete home workout plan: → Beginner Workout Plan at Home: Your First 4 Weeks, Day by Day
For new moms specifically looking for a safe return to exercise: → Postpartum Workout Plan: Your Safe, Realistic Guide to Moving Again After Baby
To understand how to keep making progress once these exercises feel easy: → What Is Progressive Overload? The Simple Rule That Makes Home Workouts Actually Work
References
- McGill, S.M. (2010). Core Training: Evidence Translating to Better Performance and Injury Prevention. Strength and Conditioning Journal.
- Axler, C.T., & McGill, S.M. (1997). Low back loads over a variety of abdominal exercises: searching for the safest abdominal challenge. Medicine & Science in Sports & Exercise.
- Escamilla, R.F., et al. (2010). Core Muscle Activation During Swiss Ball and Traditional Abdominal Exercises. Journal of Orthopedic & Sports Physical Therapy.
- Healthline. How to Do Crunches and Safer Core Alternatives. https://www.healthline.com/health/exercise-fitness/how-to-do-crunches
- American College of Sports Medicine (ACSM). Core Stability Training. https://www.acsm.org